Harley CV Carburetor Tuning Issues & Troubleshooting
Please Read: Note about repair advice.
Troubleshooting the Harley CV carburetor
Hesitation or stalling can sometimes occur after tuning or rebuilding your Harley CV carburetor or if your Harley carb has not been maintained.
The following are common issues sometimes encountered after tuning or rebuilding a Harley CV carburetor. Please refer to your installation instructions included with all CVP Tuners Kits. When installing a rebuild kit (OEM, no instructions) consult your factory service manual for instructions.
If troubleshooting a 2004-2006 model be sure to check the Diagnostic Trouble Codes (DTC) first to troubleshoot any sensor issues.
1) The #1 cause of hesitation and performance issues following a carburetor rebuild or install is VACUUM LEAKS. The importance of a perfect seal where the carburetor spigot press fits to the manifold boot seal is critical. The smallest leak will have a big impact on performance, throw off jetting (require larger jets), and directly affect the mixture screw setting. Applying a small amount of silicone grease to the inside of the manifold boot and making sure the carburetor presses firmly into the boot often cures most problems. The boot seal must be replaced periodically.
To test for a vacuum leak, use a propane torch (unlit) and wave the gas around the manifold area while the engine idles. If there is a vacuum leak the gas will be drawn into the leak and cause the engine RPM to slow or fluctuate. DO NOT PERFORM THIS NEAR AN OPEN FLAME.
Again it should be emphasized, the #1 cause of carburetor related problems on a Harley or other V-Twin motorcycle is VACUUM LEAKS. The CV carb is dependent upon vacuum to function properly.
2) Check that the Needle Jet (nozzle) is installed correctly. Installing the jet upside down will adversely impact the fuel spray and needle metering.
If your needle jet is missing or worn CVP carries new needle jets.
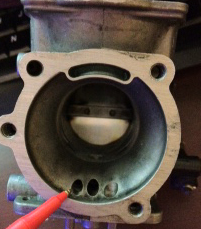
3) Clogged idle mixture circuit. Inside the CV carburetor there are a series of tiny passages connecting the mixture screw, pilot jet, and air intake jet located on the front face of the carburetor (pictured below). Dirt or old fuel that has become lacquer will clog these passages causing hesitation or lean popping.
Cleaning the idle circuit passages requires compressed air.
- Remove the Harley carb pilot jet.
- Remove the mixture screw, spring, washer, and o-ring.
- Spray a small amount of mild carburetor or fuel injection cleaner into the pilot jet passage and mixture screw passage. Do not allow any cleaning fluid to come in contact with the slide diaphragm (remove if needed) or the mixture screw o-ring.
- Use compressed air to clear the passages.
WEAR PROTECTIVE EYEWEAR.
- Start by covering the pilot passage hole with your thumb and use the nozzle of the compressed air on the mixture screw hole. Air should come out of the air intake jet shown in the picture.
- Repeat the same procedure covering the mixture hole and using the air on the pilot jet hole.
- Inspect the pilot jet for any foreign material that could have become lodged inside.
4) Accelerator pump weak or not spraying. Check that fuel sprays from the accelerator pump nozzle when rolling on the throttle (test with engine off). The accelerator pump diaphragm will wear or crack over time or if left to sit in a fuel filled CV carburetor for extended periods and will eventually deteriorate.
5) Pinched or cracked slide diaphragm. If the slide diaphragm becomes pinched or is unable to seal, the slide will not function correctly. Slide diaphragms for the Harley CV carb slide are not sold separately, so the only fix is to replace the Harley vacuum slide.
6) Over-drilled slide port. On the underside of the slide there is an offset hole used to displace vacuum/air as the slide moves up and down. The size of this hole can adversely effect the position and rate of travel of the slide. For several years many articles and companies promoted the practice of drilling the slide using a 1/8" drill bit. This was later found to harm performance and cause erratic behavior as the slide attempted to bounce and search for correct positioning. Unfortunately those articles with the 1/8" recommendations are still widely published or found online and unsuspecting Harley owners perform that modification damaging the vacuum slide. The maximum recommended hole size for the slide port should never exceed 7/64". You can use a 1/8 drill bit as a gauge to check the vacuum port hole size. If your slide has already been drilled at or larger than 1/8" then complete replacement of the slide is recommended.
7) Exhaust leaks. While not often associated with a carburetor problem, an exhaust leak is often overlooked and can lead to off-idle hesitation and deceleration pops. The gaskets between the head pipes and the exhaust ports of the heads is a crush fit that will leak if the pipes are removed, reinstalled, or over/under torqued. Cool air drawn into the exhaust at these seals will result in hesitation or popping commonly misdiagnosed as a carburetor problem. Modified pipes and removing the baffles will also impact performance regardless of how a carburetor is tuned.
8) Gas cap venting. Another problem that will cause intermittent issues with fuel delivery is a gas cap with a malfunctioning vent. The built in vent inside the gas cap allows air to be drawn into the tank to displace the fuel as it is used. If the vent sticks closed a vacuum will build inside the tank thus slowing fuel delivery and sometimes starving the carburetor. Replace the gas cap as needed.
9) Worn float fuel valve. The float valve constantly meters the fuel level in the float bowl. If the rubber valve tip becomes worn the carburetor is prone to flooding. Also if the valve sticks due to a build up of lacquered fuel you may experience erratic fuel delivery.
10) Finally do not underestimate the importance of fresh clean fuel and a fresh set of spark plugs. Gasoline that is old or left to sit in the tank or fuel system will change over time, often becoming lacquer and clogging small passages. Old fuel also burns differently as it separates and evaporates which leaves an incorrect balance of fuel additives which the combustion process cannot burn as efficiently. Never attempt to tune an engine with fuel that has sat for more than 3 months. Refer to #3 if fuel has been allowed to sit in a carburetor for extended periods of time. Spark plugs even when cleaned can have internal cracks or fractures in the electrode that increase resistance and lead to weak spark.
Make sure your Harley mixture screw tuning has already been dialed in properly before and after any jetting changes.
NOTE: CVP does not provide repair advice. The topics on this page are meant as recommendations or a guide only and are not a substitute for the advice from a qualified repair technician.
CV Performance is not a service or repair shop. We are unable to provide technical assistance or troubleshoot repair conditions including ignition, electrical, engine issues, or provide advice on installing products under non standard applications (Shovelheads, non-Harleys, etc). In addition we are unable to provide advice or assistance on any motorcycle that was previously not running properly. Any performance or replacement product is only designed to improve or restore the performance of a Harley motorcycle that is already in good running condition. If in doubt always consult the factory service manual and a qualified motorcycle technician.
Back to top
As a manufacturer and supplier we are unable to provide telephone technical support. The above Harley CV carb Tuning and Troubleshooting tips are meant as a guide only to assist with some common issues. Please visit our support forum for post-purchase support of our products. When in doubt consult your factory service manual and/or a professional motorcycle technician.
Harley CV Carburetor reference diagram
Click on image below to view diagram with H-D part numbers.

View carburetor diagram and parts list.