STEP ONE - FLOAT BOWL REMOVAL
- Shut off Fuel Valve
- Remove the carburetor.
- Remove float bowl as described in the repair manual.
STEP TWO - REMOVE FACTORY PEDESTAL
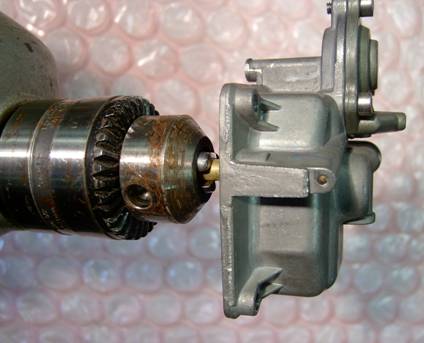
- Place stock pedestal in the chuck of an available drill to hold, or use a bench vice. Note that a keyless chuck may not be strong enough, in which case use a bench vice.
- If using a drill chuck, tighten chuck jaws firmly on the large diameter of the factory original pedestal as pictured below. Do not turn on the drill.
- Holding drill chuck stationary with your hand, pull and twist float bowl clockwise and counterclockwise until pedestal comes free from body. If using a vice, twist the bowl while pulling away from the vice. DO NOT USE VICEGRIPS, you will damage the or elongate the bore in the bowl.
- Some model carburetors use a sliding check needle under the pedestal whereas others may incorporate a checkball under the old pedestal nozzle. If applicable, place your original check needle in bowl mounting hole before mounting new pedestal nozzle. DO NOT lose this check-valve piece as they were never available from the factory nor from CVP.
STEP THREE - INSTALLING NEW PEDESTAL NOZZLE
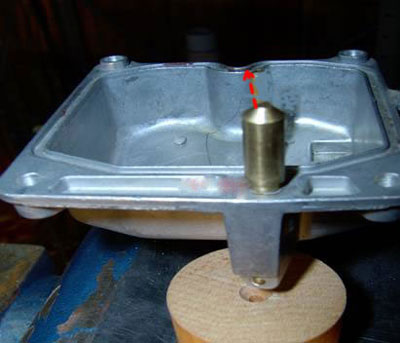
- Place new pedestal nozzle in the mounting hole. Position so the spray hole is pointing in toward the center of carburetor throat or toward the slide needle.
- Support float bowl directly under float bowl pedestal with a piece of wood.
- Either press in with a clamp or press, or lightly tap pedestal using a small soft plastic mallet or piece of wood until the pedestal is pressed into the bowl.
The pedestal should be pressed into the bowl until the included o-ring contacts the surface, no need to crush it tightly.
- Before installing back onto the carburetor body, check that the accelerator pump diaphragm is in good working condition. Diaphragms that have been exposed to long periods of storage in old fuel or have aged should be replaced at this time.
STEP FOUR - INSTALL FLOAT BOWL
- Replace float bowl back on carburetor body. A small amount of silicone lubricant (spark plug boot lube) may be spread thinly on the bowl seal. Never use any type of sealant. Models with vacuum controlled fuel petcock valves require a small amount of fuel to be added to float bowl during installation. This greatly reduces cranking time on initial start up.
- Make sure accelerator pump rod (with boot) slips back into the accelerator pump well as the bowl is positioned back onto the body.
- Install the 4 supplied stainless steel screws and washers.
Low Profile Accelerator Pump Nozzle
Accelerator Pump Diaphragm
*Consult your factory service manual for any mechanical work. Installer is responsible for following all safety precautions outlined in the factory service manual. The above descriptions are provided as a basic guide and assumes no liability for any damages or injury. Never work on a carburetor or related fuel system in the presence of an open flame or heat source. If unsure of any procedure please consult a trained motorcycle technician or other professional.
|